

I recently read Srijit Banerjee’s excellent article, which brought to light ugly things done by service providers to fool their customers who have grown accustomed to the ping google.com command to judge the quality of the internet.
While he has strayed away from how this is done, I feel that educating people on how this can be done and how to ensure that they are not a victim is much more important.
My setup
My setup for testing looked something like this. Everything was virtualised with Virtualbox. For the router I picked up the CHR(Cloud Hosted Router) images from Mikrotik’s website.

Connections made from 192.168.100.3 through to the internet through the default gateway 192.168.100.2 is also source NATed. The other connection between the Mikrotik CHR VM and the host is also source NATed by Virtualbox.
Let’s do a ping from VM 1 to 8.8.8.8:
arhue@ubuntu:~$ ping -c 3 8.8.8.8
PING 8.8.8.8 (8.8.8.8) 56(84) bytes of data.
64 bytes from 8.8.8.8: icmp_seq=1 ttl=56 time=313 ms
64 bytes from 8.8.8.8: icmp_seq=2 ttl=56 time=79.9 ms
64 bytes from 8.8.8.8: icmp_seq=3 ttl=56 time=63.1 ms

--- 8.8.8.8 ping statistics ---
3 packets transmitted, 3 received, 0% packet loss, time 2004ms
rtt min/avg/max/mdev = 63.133/152.072/313.158/114.111 ms
Very normal for a tethered 4G connection. All of this faking of pings relies on one simple concept:
Destination NAT (Port forwarding)
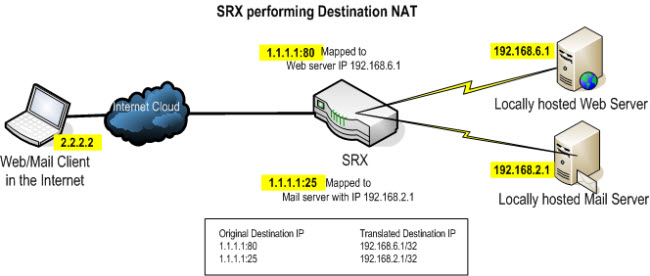
This essentially allows you to map a single IP or a set of IPs to a single IP or a set of IPs by matching transport layer parameters like ports, protocol used for transimission etc. Traffic can also be directed to a single port. The destination address and port is rewritten to by the router. The same is done for the source packet on return. Think of it as opposite of source NAT. So essentially just matching every IP on the Google’s address list and destination NATing it to a single IP will allow for this. Care has to be taken to do this for only for things you want up ending up at the new server.
Taking it for a spin
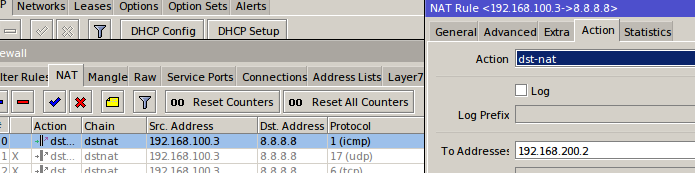
For now let’s do it only for ICMP so that only ICMP traffic ends up at 192.168.200.2.
Ping from VM 1 to 8.8.8.8:
arhue@ubuntu:~$ ping -c 3 8.8.8.8
PING 8.8.8.8 (8.8.8.8) 56(84) bytes of data.
64 bytes from 8.8.8.8: icmp_seq=1 ttl=63 time=1.89 ms
64 bytes from 8.8.8.8: icmp_seq=2 ttl=63 time=1.98 ms
64 bytes from 8.8.8.8: icmp_seq=3 ttl=63 time=2.14 ms

--- 8.8.8.8 ping statistics ---
3 packets transmitted, 3 received, 0% packet loss, time 2014ms
rtt min/avg/max/mdev = 1.896/2.009/2.149/0.105 ms
Traceroute from VM 1 to 8.8.8.8 with ICMP:
arhue@ubuntu:~$ sudo traceroute --icmp 8.8.8.8
traceroute to 8.8.8.8 (8.8.8.8), 30 hops max, 60 byte packets
 1  google-public-dns-a.google.com (8.8.8.8)  0.627 ms  0.530 ms  0.638 ms
 2  google-public-dns-a.google.com (8.8.8.8)  3.570 ms  3.520 ms  3.451 ms
Tcpdump running on VM 2 with two pings sent/received from VM 1:
arhue@ubuntu-spoofer:~$ sudo tcpdump -i enp0s8 icmp
[sudo] password for arhue:
tcpdump: verbose output suppressed, use -v or -vv for full protocol decode
listening on enp0s8, link-type EN10MB (Ethernet), capture size 262144 bytes
02:25:50.197457 IP 192.168.100.3 > 192.168.200.2: ICMP echo request, id 1633, seq 1, length 64
02:25:50.197518 IP 192.168.200.2 > 192.168.100.3: ICMP echo reply, id 1633, seq 1, length 64
02:25:51.201668 IP 192.168.100.3 > 192.168.200.2: ICMP echo request, id 1633, seq 2, length 64
02:25:51.201732 IP 192.168.200.2 > 192.168.100.3: ICMP echo reply, id 1633, seq 2, length 64
Have a look at the SRC/DEST IP. There is something interesting going on here. The destination IP is being changed by the router for the ICMP packets to 8.8.8.8 to 192.168.200.2 and SRC IP back to 8.8.8.8 from 192.168.200.2 on return. Tcpdump makes this very clear.
UDP traceroutes
Traceroute from VM 1 to 8.8.8.8 with UDP:
arhue@varun-laptop:~$ sudo traceroute --udp 8.8.8.8
traceroute to 8.8.8.8 (8.8.8.8), 30 hops max, 60 byte packets
 1  192.168.100.2 (192.168.100.2)  0.883 ms  0.834 ms  0.630 ms
 2  192.168.50.1 (192.168.50.1)  1.139 ms  1.492 ms  1.591 ms
 3  * * *
 4  * * *
 5  10.206.233.129 (10.206.233.129)  269.318 ms  269.359 ms  269.342 ms
 6  125.19.2.37 (125.19.2.37)  271.798 ms  271.795 ms  271.695 ms
 7  182.79.224.21 (182.79.224.21)  271.767 ms 182.79.217.33 (182.79.217.33)  271.758 ms 182.79.247.54 (182.79.247.54)  271.751 ms
 8  72.14.220.197 (72.14.220.197)  271.744 ms  79.663 ms  79.537 ms
 9  108.170.248.161 (108.170.248.161)  76.414 ms 108.170.248.193 (108.170.248.193)  74.400 ms 108.170.248.209 (108.170.248.209)  74.383 ms
 10  google-public-dns-a.google.com (8.8.8.8)  109.846 ms  75.681 ms  110.936 ms
As expected, the UDP traceroute will land at the correct place.
Manipulating latency
This can be done with the tc GNU/Linux command. Let’s add 15 ms to make it look a little bit more believable.
On VM 2:
arhue@ubuntu-spoofer:~$ sudo tc qdisc add dev enp0s8 root netem delay 15ms
[sudo] password for arhue:
On VM 1:
arhue@ubuntu:~$ ping 8.8.8.8
PING 8.8.8.8 (8.8.8.8) 56(84) bytes of data.
64 bytes from 8.8.8.8: icmp_seq=1 ttl=63 time=16.9 ms
64 bytes from 8.8.8.8: icmp_seq=2 ttl=63 time=18.0 ms
64 bytes from 8.8.8.8: icmp_seq=3 ttl=63 time=18.5 ms
Well there you go! A lot more believable.
Similarly this whole process can be done for a bunch of IPs by importing address lists of a particular ASN/network you want to manipulate the traceroutes/pings of.
Preventing against it
By using lots of tcpdump I found out that traceroutes can be done in four different ways:
- ICMP – This is how Windows does it. traceroute command on GNU/Linux can do this if you pass the –icmp flag. Can be easily be manipulated
- UDP (Unix style) – Ports between 33435-33655 are usually used. This is the normal way of doing traceroutes on GNU/Linux and Mac OS. This can be easily marked and traffic manipulated again.
- UDP – This works on port 53. This can be used with –udp flag with the traceroute command on GNU/Linux. I am not sure how this can be manipulated.
- TCP – This works on port 80. This can be used with –tcp flag with the traceroute command on GNU/Linux. I am not sure how this can be manipulated.
If traceroute traffic can be marked, its routing policy can definitely be edited depending on that marking. I wanted to investigate this more but I have lots of work pending to do. The truly best way of preventing this is picking up the phone and screaming at your ISP for doing these stupid illicit things rather than focusing on sell a good service to the customer.
Offending ISPs
Since Srijit’s blog had talked about North Eastern ISPs doing this shady practise, I did a RIPE Atlas tests on the only ISP who’s name I knew. The result was surprising!
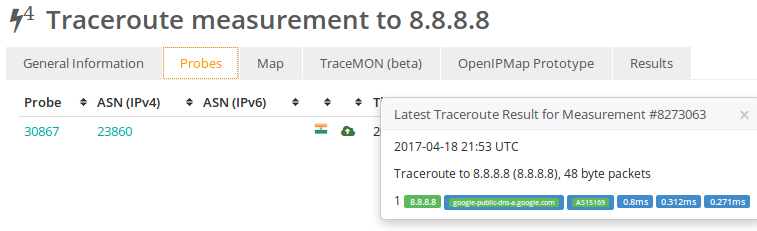
Surprisingly traceroutes for UDP, ICMP and TCP traffic were similar so they have indeed found a way to manipulate UDP and TCP traceroutes as well.
But the DNS test does give us a clue on the pings and traceroutes being completely wrong.
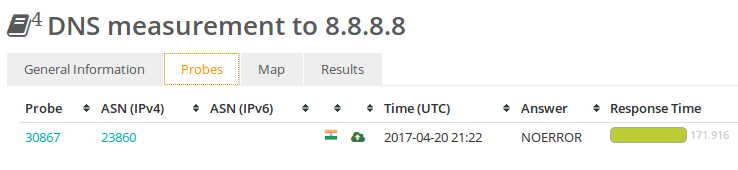
The latency should never be that high to fetch the A record of google.com.
Links to all RIPE Atlas measurements:
Finishing thoughts
I think one day when I get enough time I’ll schedule a mass traceroute from the RIPE Atlas project, process the data and tabulate a nice chart of offending ISPs to publicly shame them. People obviously will find out and when they do it isn’t going to be good for them.
I think I am done here. Good night!
If there are any errors here, please do let me know. I have written this in a hurry and don’t have enough time to proofread.
As always this being my personal blog, reflects my personal opinions only and not those of my employers.