

When I went through my Credit Card statements, I realised that I had an issue. I was spending way too much money to keep this blog going, especially for the level of traffic that I had. I get around 30-40 people viewing this blog per day and for that level of traffic, I was paying around C$30/month. That was way too much I realised I needed to trim the fat.
This is where it was all going:
| Provider | Price/month(inc taxes) | Service |
| Vultr | C$15.4($10 2GB ram plan) | Virtual Machine |
| Vultr | C$3.1($2/m) | Backup Service |
| Vultr | C$4.6 | Snapshots |
| AWS | C$1.8 | Route 53 DNS |
| AWS | C$1.5 | S3+Cloudfront CDN+SES |
| AWS | C$22.5/y(C$1.9/m) | Domain registration |
| Total | C$28.3 |
To add, I didn’t like the fact that AWS couldn’t move me over to my Canadian address so I had to manually pay using my Indian credit card every month. I had to login and pay with the OTP, which was a massive pain. I also had to pay the Indian 18% GST tax. I thought of getting rid of WordPress and moving to a static site generator, but it was too much work to move everything over. Besides, I liked WordPress’ WYSIWYG editor, commenting and newsletter.
The first step was to reduce complexity-get rid of Cloudfront CDN because it isn’t really needed for a low traffic website like this.
Getting rid of CDN
WordPress does not have native support for CDNs. Back when I setup this blog, I used a third-party plugin called WP Offload Media to copy over images to Amazon S3 and then serve it with Cloudfront CDN. The images would also be deleted from the server to save space. Cloudfront CDN can deliver images with low latency and high performance since they cache content close to the user.
Overtime I realised that this setup was overkill for the amount of traffic this blog was getting. Maintaining it can be bit of a pain and it would often not work well with some other plugins or integrations. I ultimately decided to get rid of it, however the feature to delete the S3 bucket and copy over contents to local disk was hidden behind a $60/y subscription, which I did not want to pay. I downloaded the contents of the S3 bucket and realised the contents were all there, but the directory contents were a bit obfuscated. I asked ChatGPT to write me a script to fix this and that managed to fix the issue.
base_dir="."
for year in {2016..2024}; do
  for month in {01..12}; do
    sub_dir="$base_dir/$year/$month"
    if [ -d "$sub_dir" ]; then
      find "$sub_dir" -mindepth 2 -type f -exec mv -t "$sub_dir" {} +
      find "$sub_dir" -mindepth 1 -type d -empty -delete
    fi
  done
done
I got rid of the plugin and that was it! All images were returned back to me.
Trimming the Fat – Getting Rid of Plugins
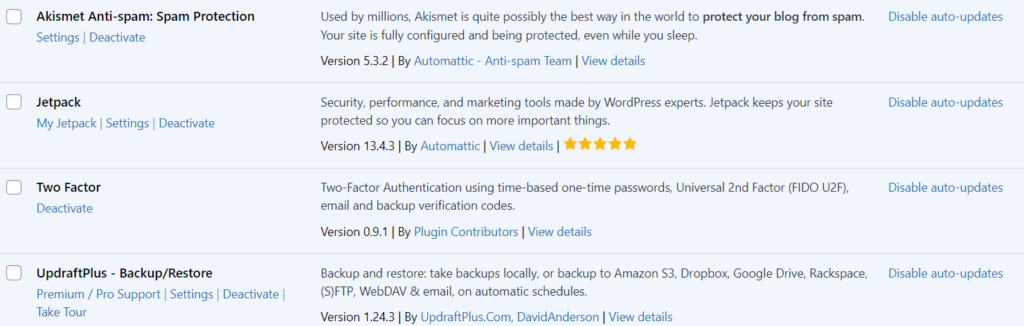
One big reason why WordPress takes the resources it does and requires a lot of maintenance is because people end up installing plugins for every small thing. A lot of plugins aren’t very well written or maintained. It also adds lot of bloat, lot of which you may not want or absolutely need. Simpler WordPress installs are easier to maintain, update and require less resources to run. That way I could fit the install on a server with minimal resources. I had 13 plugins when I started the process of getting rid of plugins that I absolutely do not need, and currently have 4 installed. These are the plugins I got rid of:
- All in One SEO – I didn’t fully use it and Jetpack does have basic SEO features
- Wordfence Security – Heavy plugin, Jetpack can do basic login protection. I installed Two Factor plugin to do 2FA.
- Postman SMTP – Not maintained for the last 6 years, caused me issues during migration. You don’t actually need a plugin to send mail with WordPress. More on that later.
- Google Analytics – It’s a better idea to embed analytics code in child theme or better yet, just use Jetpack’s analytics feature.
- Contact Form 7 – I used it for the Contact page. Didn’t get enough mail to justify it. Just send me an Email.
- Site Reviews Pro – Used it for just one page. Into the chopping block it goes!
- WP Offload Media – Explained above.
- AWS Plugin for WP Offload Media – Wasn’t actually needed. Not sure why I still had it installed.
- Google Fonts – Not sure why I had it installed. Didn’t make a difference when I removed it.
I also got rid of Themes that I didn’t need. At the end I was left with these plugins. You don’t need the Backup/Restore plugin too if you want to write a cronjob for it, but I decided the plugin was reliable enough over the years that I had used it and I didn’t want to get rid of it.
Next thing to do was to choose the new host.
Best Options for Free VPS Hosting
When I normally hear of free hosting, I would have run far far away. There is usually always a catch. Most of cheap hosting providers are self hosted ones and the quality is often poor, with most of their budgets going towards marketing and customer support. However, today there are decent options among the cloud providers. Cloud providers make a lot of money off enterprise and as such are OK with giving away some resources for free to hobbyists, with the hope that they would make it back in the long run because hobbyists are usually the same people running servers for enterprises and would be more likely to recommend these services in the workplace. After doing some digging, these are some good options you have:
- AWS EC2 – t3.micro(2 vCPU, 1GB RAM) free for a year free.
- Azure – b2pts/b2ats(2 vCPU, 1GB RAM AMD/ARM) free for a year.
- Oracle Cloud – 4 core ARM CPU, 24GB RAM, 200GB disk forever free.
- Vultr Free Tier – 1 vCPU, 512MB RAM, 10GB disk free for a year. Seattle, Miami, Frankfurt only.
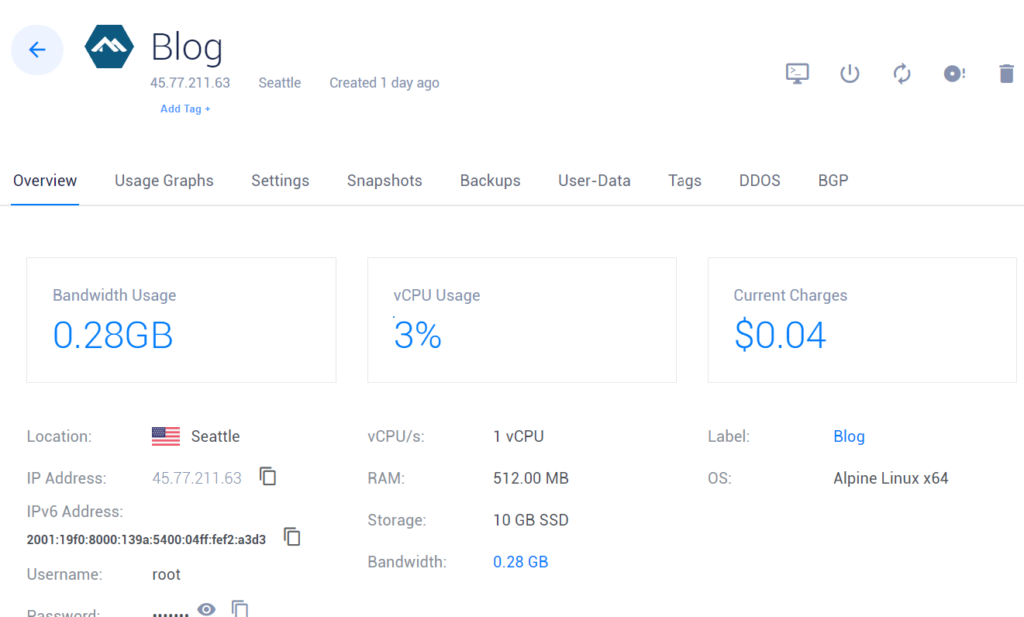
I decided to go with Vultr free tier because I was already familiar with the service and I like that everything in the panel is simple. Most of the other cloud providers have very complicated UIs and not so transparent terms. I also got the Oracle Cloud VM and am running some workload just incase I want to use it in the future. Once you sign up for the free tier trial, you will need to wait to get approved. Once approved, you will be able to create the VM. It costs $2.5/month after 1 year. I also got the backup option for $1.2/month. I created the VM with Alpine as the OS. I also moved over the DNS to Vultr so no need to pay the Route53 costs as well.
Setting up the Server
I decided to use Docker Compose to get everything running. Docker Compose makes it easy to setup a server, update components and keep things on the host clean. This is what my Docker file looked like.
services:
  caddy:
    image: caddy:2-alpine
    restart: always
    ports:
      - "80:80"
      - "443:443"
      - "443:443/udp"
    cap_add:
      - NET_ADMIN
    volumes:
      - caddy_config:/config
      - caddy_data:/data
      - ./html:/var/www/html
    configs:
      - source: caddyfile
        target: /etc/caddy/Caddyfile
  wordpress:
    image: wordpress:fpm-alpine
    restart: always
    volumes:
      - ./html:/var/www/html
    depends_on:
      - db
  db:
    image: mariadb:lts-ubi
    restart: always
    ports:
      - 3306:3306
    environment:
      MARIADB_AUTO_UPGRADE: 1
      MYSQL_DATABASE: "yyyy"
      MYSQL_USER: "zzzz"
      MYSQL_PASSWORD: "xxxx"
      MYSQL_ROOT_PASSWORD: "abc"
    volumes:
      - wpdb:/var/lib/mysql
configs:
  caddyfile:
    content: |
      varunpriolkar.com {
         encode zstd gzip
         root * /var/www/html
         tls me@varunpriolkar.com
         encode zstd gzip
         file_server
         php_fastcgi wordpress:9000
         @static {
             file
             path *.ico *.css *.js *.gif *.webp *.avif *.jpg *.jpeg *.png *.svg *.woff *.woff2
         }
         header @static Cache-Control max-age=604800
         @disallowed {
             path *.sql
             path /wp-content/uploads/*.php
         }
         rewrite @disallowed '/index.php'
         tls me@varunpriolkar.com
      }
      www.varunpriolkar.com {
          redir https://varunpriolkar.com{uri}
      }
volumes:
  wpdb:
  caddy_config:
  caddy_data:
Once I copied over the webroot and DB, everything worked as intended. I also tried FrankenPHP, but ran into problems so I decided to stick with the official image. However I ran into the server crashing because the resource usage was too high and another issue with networking causing issues with loopback requests.
Fixing Problems – Loopback Requests
One major problem I ran into was that the site was not able to perform loopback requests. Loopback requests are nothing but the website trying to make a GET request to itself using PHP. The issue is simply that my website was trying to call varunpriolkar.com from the PHP container, but this simply wouldn’t work.
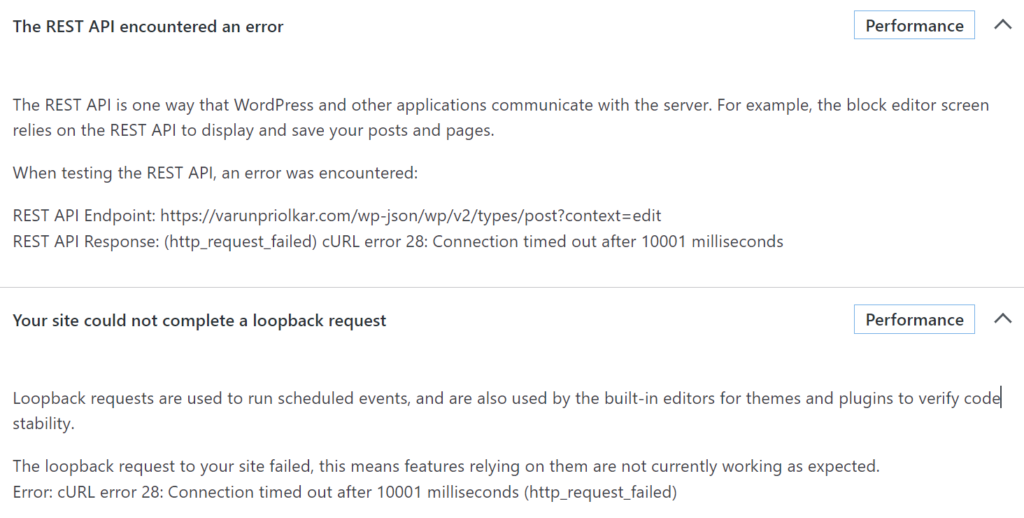
This is a major issue that affects everyone that uses the official WordPress PHP-FPM Docker image. However, I couldn’t find the solution anywhere. The solution was a simple one. There needed to be a way to set varunpriolkar.com to the IP of the Caddy container.
services:
...
  wordpress:
    image: wordpress:fpm-alpine
    ...
    links:
      - "caddy:varunpriolkar.com"
This change did the trick and solved the issue.
Tuning for Low Memory
Because I had only only 512MB of RAM(460 MB in reality) to play with, I had to tune everything to consume less RAM. Otherwise the VM would just freeze up under load. The first thing to do was to set memory limits for every component so that they don’t over consume resources. This is easy to do with Docker.
services:
  caddy:
  ...
    deploy:
      resources:
        limits:
          memory: 60M
  wordpress:
  ...
    deploy:
      resources:
        limits:
          memory: 150M
It didn’t work well with MariaDB so I skipped it. Next, I got into tuning PHP and MariaDB. This is what I came up with:
services:
  wordpress:
    ...
    configs:
      - source: php_fpm
        target: /usr/local/etc/php-fpm.d/www.conf
      - source: php_ini
        target: /usr/local/etc/php/php.ini
      - source: php_opcache
        target: /usr/local/etc/php/conf.d/opcache-recommended.ini
  db:
    ...
    command: mysqld --innodb-buffer-pool-size=16M
configs:
  php_opcache:
    content: |
      opcache.memory_consumption=32
      opcache.interned_strings_buffer=8
      opcache.max_accelerated_files=4000
      opcache.revalidate_freq=2
  php_ini:
    content: |
      memory_limit=64M
      upload_max_filesize=8M
  php_fpm:
    content: |
      [www]
      user = www-data
      group = www-data
      listen = 127.0.0.1:9000
      pm = static
      pm.max_children = 2
For PHP, I restricted each worker to 64MB, reduced the number of workers to 2 and reduced size of the opcache. For MariaDB, reducing buffer size had the most impact. I also had to set WP_MEMORY_LIMIT and WP_MAX_MEMORY_LIMIT to 64MB in wp_config.php. After implementing these changes the server was sitting on 345MB memory usage.
I also installed the WP Super Cache plugin and had to add the following in my Caddyfile config after enabling Expert Mode.
	@cache {
		not header_regexp Cookie "comment_author|wordpress_[a-f0-9]+|wp-postpass|wordpress_logged_in"
		not path_regexp "(/wp-admin/|/xmlrpc.php|/wp-(app|cron|login|register|mail).php|wp-.*.php|/feed/|index.php|wp-comments-popup.php|wp-links-opml.php|wp-locations.php|sitemap(index)?.xml|[a-z0-9-]+-sitemap([0-9]+)?.xml)"
		not method POST
		not expression {query} != ''
    }

    route @cache {
        try_files /wp-content/cache/wp-rocket/{host}{uri}/index-https.html /wp-content/cache/wp-rocket/{host}{uri}/index.html {path} {path}/index.php?{query}
    }
Fixing Mail Without Plugin
I didn’t want to add a yet another plugin and yet another email service to get mail working on my server. There is a more elegant way to do this using open source solutions – Postfix, OpenDKIM and PHPMailer(including in WordPress). How email works is that anyone can technically send an email as anyone. However, unless you use a few things to tell Email servers that it’s actually you who owns the domain that you are sending mail as, it is likely to be not delivered to inboxes. These are the important factors.
- SPF Record – Tells who is allowed to send mail.
- DKIM Record – Email is signed with private key, which can then be matched using a TXT record in DNS.
- PTR Record – Email servers check rDNS records. This can be set using Vultr’s panel.
I found a nice Docker container that packaged Postfix and OpenDKIM together.
services:
  mail:
    image: glavich/docker-postfix:latest
    environment:
      DKIM_DOMAIN: varunpriolkar.com
      DKIM_SELECTOR: mail
    volumes:
      - mail_domainkeys:/etc/opendkim/keys
volumes:
  mail_domainkeys:
After that you get the DKIM public key in Docker log, that I set in my DNS, alongwith the SPF record.

Next, I added the following code to wp-config.php.
require_once ABSPATH . 'wp-settings.php';
require_once( ABSPATH .'wp-includes/plugin.php' );
add_action( 'phpmailer_init', 'mail_smtp' );
function mail_smtp( $phpmailer ) {
  $phpmailer->isSMTP();
  $phpmailer->Host = "mail";
  $phpmailer->Port = 25;
  $phpmailer->From = "no-reply@varunpriolkar.com";
  $phpmailer->FromName = "Varun Priolkar";
  $phpmailer->SMTPAuth = false;
  $phpmailer->SMTPSecure = "none";
  $phpmailer->SMTPAutoTLS = false;
}
add_filter( 'wp_mail_from', function( $email ) {
  return "no-reply@varunpriolkar.com";
});
I also had to open a support ticket with Vultr to open port 25 for me. After trying an email delivery test using a free plugin, it seemed to have worked! 😀 If you are a subscriber, you should be getting this post emailed out to you.

Conclusion
All in all, this was a worthwhile project for me. Not only was I saving a lot of money, my website was running much better, with better performance and easier to maintain things longer term. Simplicity is king and spending more resources and money to solve a problem isn’t always the best option. This is what the final costs came to.
| Provider | Price/month | Service |
| Vultr | C$0 | Virtual Machine |
| Vultr | C$0 | DNS |
| Vultr | C$1.8 | Blog VM backup |
| Namecheap | C$14.5/yr(C$1.2/m) | Domain Registration |
| Total | C$3 |
I couldn’t resist and eek out a little more savings by moving over the domain registration to Namecheap. I could go even cheaper and get rid of the VM backups, since I can also take these with a plugin, but I prefer to have the added peace of mind. In total I am saving over C$25/month, which is C$300/year. That is not an insignificant amount of money and worth the time invested into getting this done.
Working on something cool with your blog? Found this useful? Let me know in the comments below 🙂