

I have been wanting to get back into home labbing and hosting my own infrastructure, but just didn’t have the time for it because I was busy over the summer and fall – work, flying, running, weight training, bit of travelling kept me busy. However winter, foot injury and breaking my phone gave me extra spare time and an opportunity to spend time indoors to build my Home Lab. Home Labs are great because it gives you a playground to test out new technologies and host services that you need. It’s a great way to learn infrastructure related things. I had most of the tools already with me – fast internet, 3x Lenovo M920Q Tiny mini PCs.
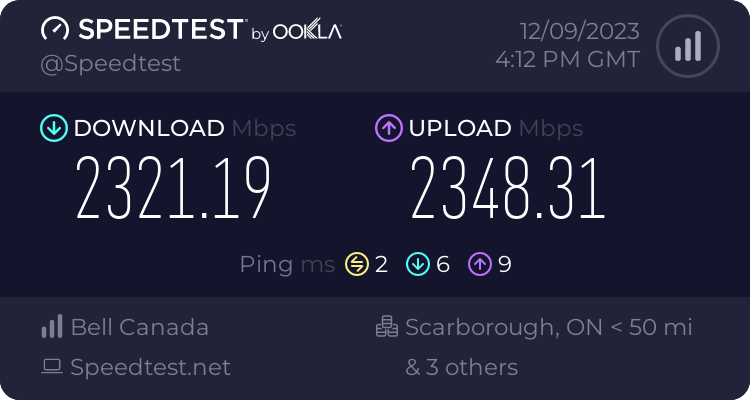
I have 3 Gbps Up/Down internet from Bell for around C$60/month. They offer upto 8 Gbps Up/Down for not that much more to me at my residence in Oshawa, ON 🇨🇦, but I didn’t need that much.
Setting up the Hardware
While buying and setting up the hardware, I had these goals in mind.
- It should be just enough – No over sizing hardware that I did not need. My biggest guilt in the past. The 40 Gbps NIC cards I have lying in the closet are a testament to that. I did not want to spend money on hardware that I may not use. I can always upgrade things when I need them
- It should be small – If I can’t carry it in a small backpack, it’s too big. I wanted everything to fit inside of a small closet because I didn’t have much space in my small apartment. Carrying oversized hardware can be a massive PITA while moving.
- It should be quiet – I’m very sensitive to noise, especially whirl from computer hardware. So everything should be quiet. I wanted to go for more ARMv8 components over x86 in this build.
- It should be expandable – I did not want to commit too much money upfront on the hardware, but I wanted for it to be able to expand to fit my requirements in the future. I decided to go for many systems which can be clustered together over a large system PC.
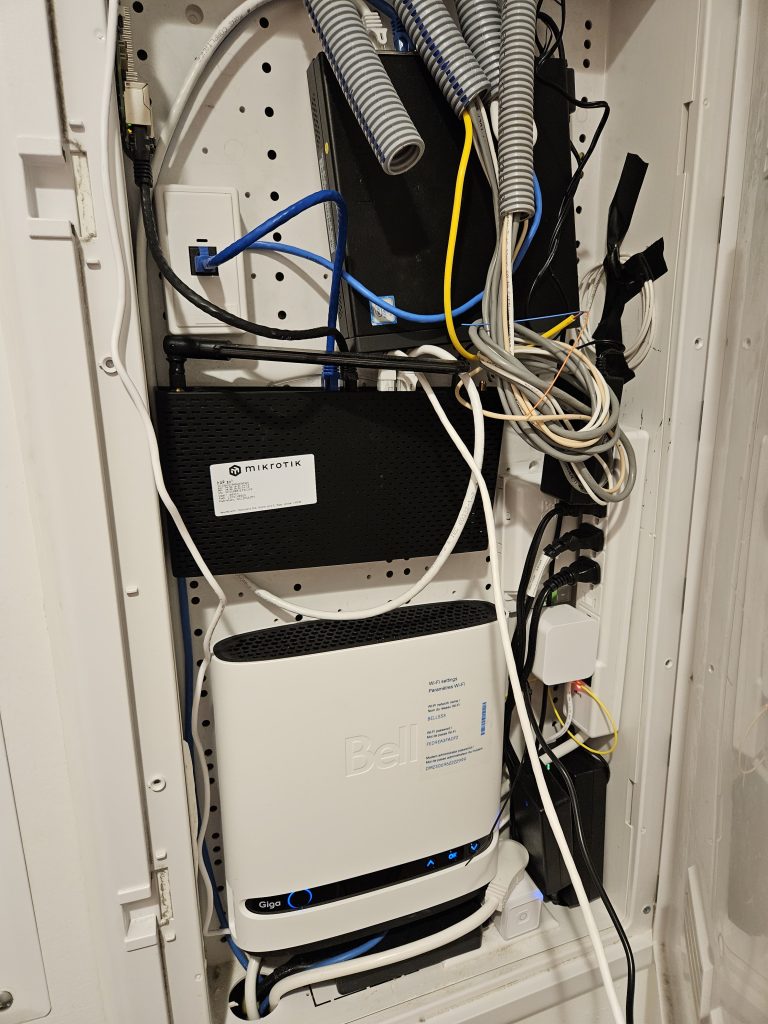
I decided to buy a Raspberry Pi 5 4GB version, because they had them in stock. For wireless and for distribution switch I got the Mikrotik HAP AX³, mostly because it had a 2.5Gbps port which could be fed from my router, decent wireless hardware(WiFi 6) and 4 1Gbps ports. It could also act as a smart switch so I could monitor it, run things like VLANs on top if I needed to.
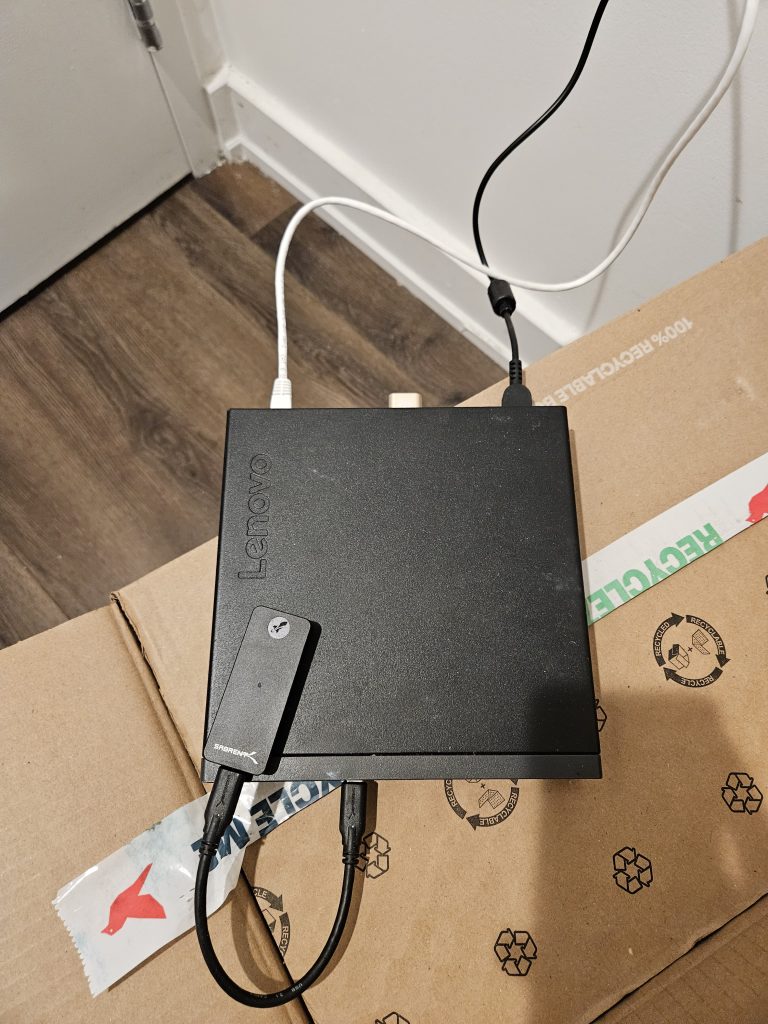
Lenovo M920Q – The Best Mini PC?
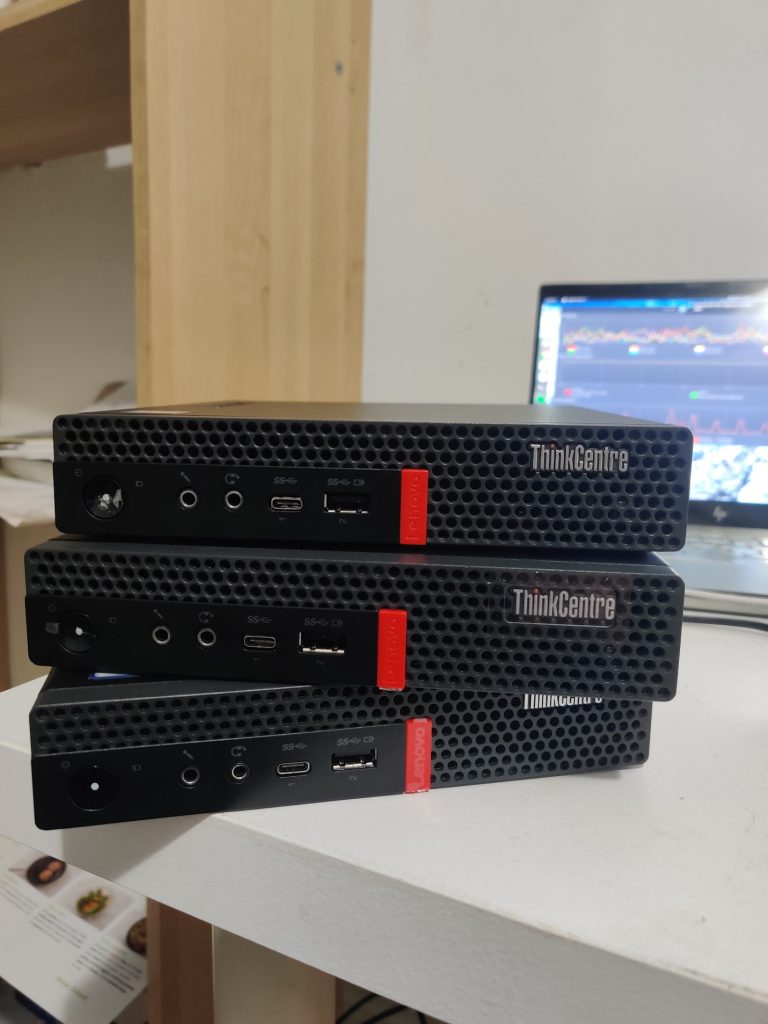
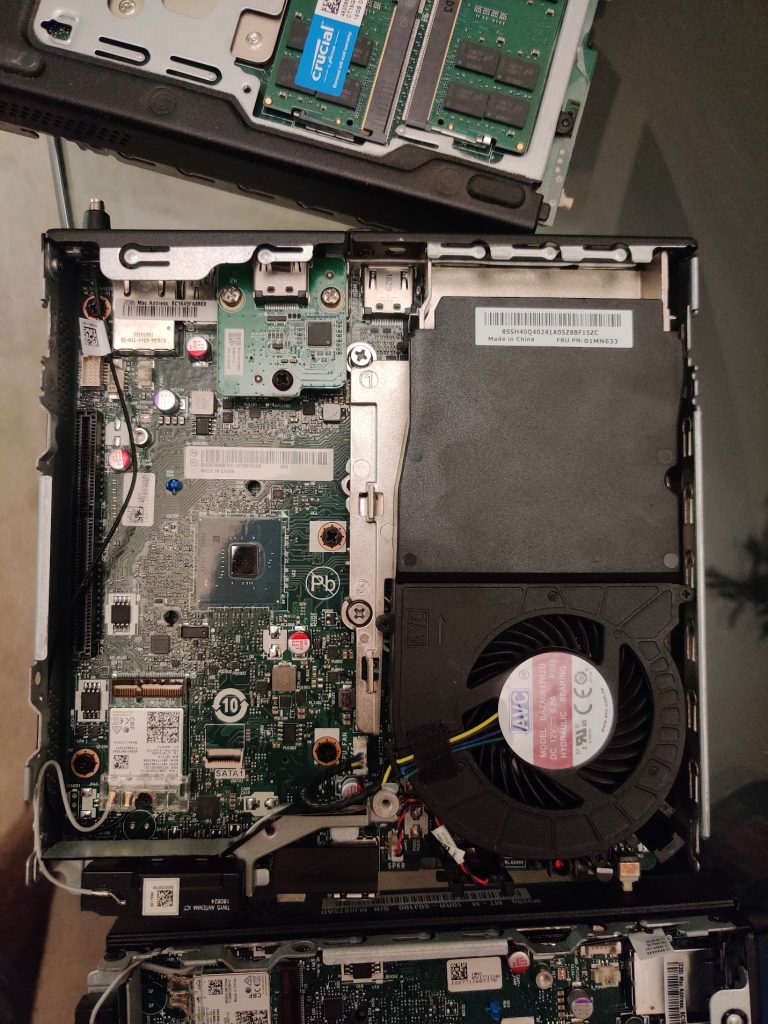
The 3 Lenovo M920Q Tiny that I had lying around were simply fantastic. I had bought them 2 years ago from the money I made from selling GPUs on Facebook Marketplace during the crypto boom and thought I had wasted my money because I didn’t put it to much use. I had even upgraded the RAM on them to max capacity – 32GB on each of them. However these turned out to be great. The best thing about them is that you can get a full x16 slot with a riser, meaning you can get unlimited expandability-from a small GPU to running 40 Gbps NIC cards to expanding storage – it can do it all, as long as power requirements are not an issue(you can find chargers with upto 130W capacity) and the card is low profile. Also these are great for monitoring because you can have Intel AMT/ME on them, which is like IPMI lite. I didn’t yet get a chance to try it out.
I added in a 2.5 Gbps Intel NIC card and a cheap 250GB M.2 SSD in one of them. This would be my router. I also re-did the thermal paste, added HDMI dummy plug and removed the wireless card in all of them. Decided to re-use the existing SSD for the other 2.
Building the Network
I wanted the network to be very simple, with just 2 devices. The Mikrotik HAP AX3, which we talked about earlier acting as the distribution switch/AP and one of the mini PCs being used as an OPNSense router. I can also run VLANs if I want to this way, but I’m saving that for later. For now I’m not sure I need the complexity in the network.
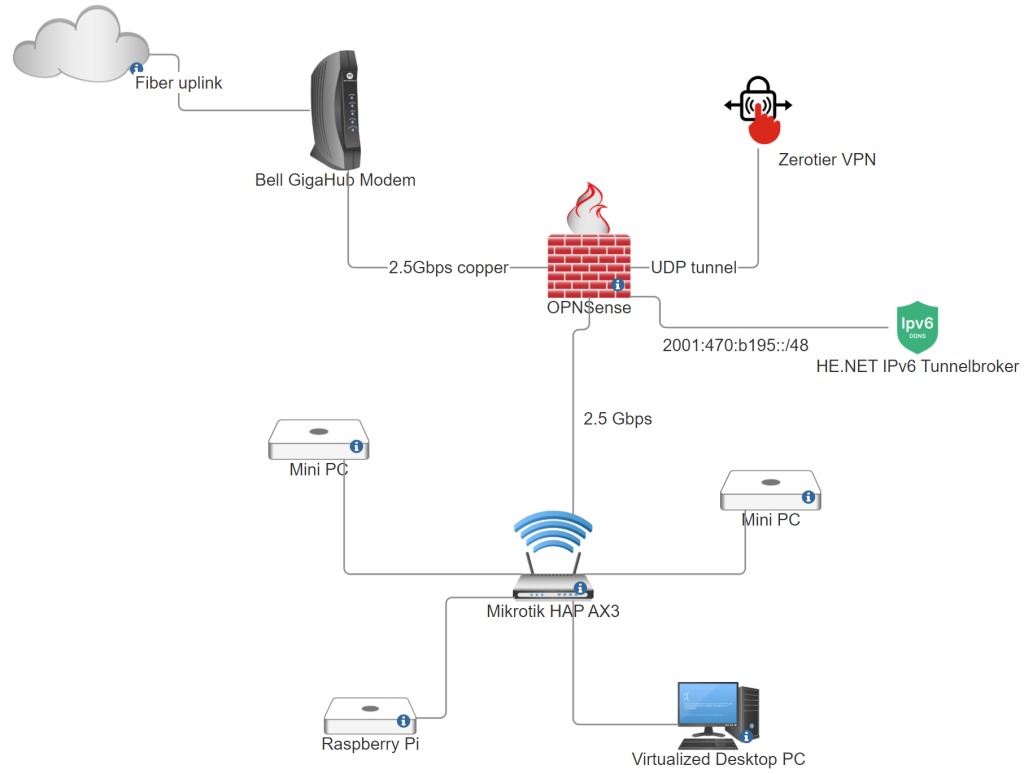
The first thing I did was setup OPNSense. The setup itself was pretty easy, nothing remarkable. For connecting it to the Bell uplink, I had to login to Bell’s website and reset my PPPoE password. After that, I had to reset my Bell modem with the new credentials and simply dial in from the OPNSense router. You should get a public IP on the WAN interface and you can create as many PPPoE connections as you like for IPv4 addresses. The only issue is that they are dynamic, although that should not be an issue because they don’t change if you don’t reboot your router. I have seen them not change for 1.5 years because the router wasn’t rebooted. I also setup Adguard DNS for filtering ads on my network and setup Zerotier for my work VPN so that I could access my work websites from home.

Next, I hooked up the HAP AX3 in AP/bridge mode. Connecting my PC, Raspberry Pi and other devices was pretty straightforward.
Fixing what’s broken – IPv6
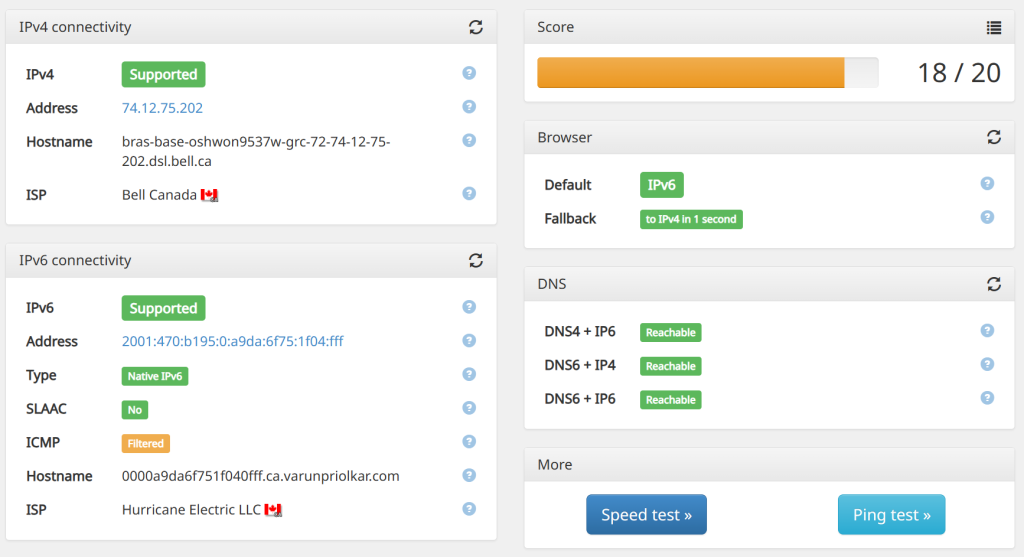
My internet provider does not do IPv6 for their non-mobility customers. HE’s Tunnel Broker service is great to get a routed /48, /64 for free. The latency to their Toronto POP was great(2-3ms). So I set it up on my OPNSense router. Everything was straightforwarding. I decided to do both SLAAC+DHCPv6 on my LAN. That way everything from phones to printers to servers should work well. I did setup reverse DNS for this later.
Building the Infrastructure – Proxmox, Docker Swarm
I decided to virtualize everything, mostly because it gave me a degree of control and ability to snapshot, backup everything incase I made a mistake. The only exception to this was the router(decided to keep it simple), AP and the Raspberry Pi. I decided to use Proxmox VE for my hypervisor because I had some experience with it. The mini PCs were then clustered with my desktop Proxmox. I used ZFS for the file system on all Proxmox nodes for easy expandability.
Next, I had to decide on some system for running workloads. After trying to pick between Kubernetes, , Nomad or Docker Swarm, I decided to go with the latter because it was the easiest of the bunch. You also need clustered storage so that applications can move between the hosts. I decided to go with GlusterFS for that and provisioned 2 VMs, which would work together with the Raspberry Pi for clustering.
GlusterFS – Replicated Storage
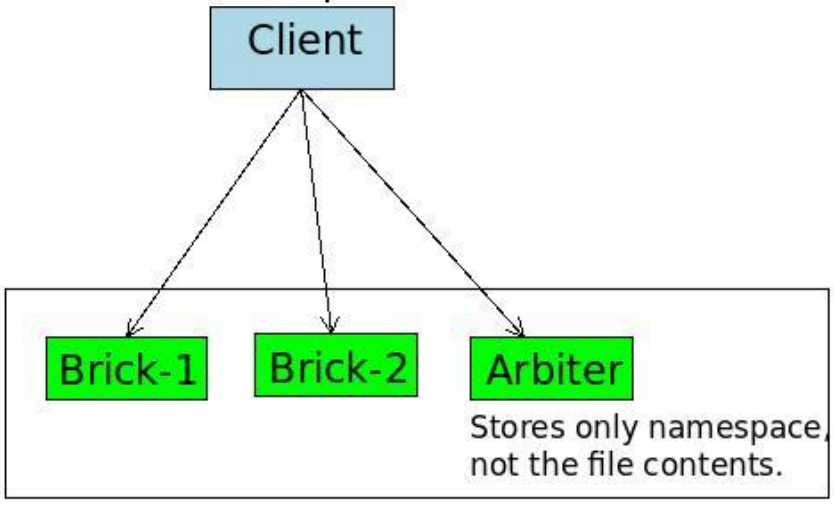
GlusterFS seemed like a simple, easy clustered file system. I didn’t go the Ceph route because I didn’t have the hardware for it. Ceph can be network heavy and picky about what underlying disks you use. With Gluster 2 of the VMs would be my replicas, with the Raspberry Pi acting as the arbiter. This way I can expand the pool by simply expanding the VM. ZFS on underlying hypervisor can also allow me to add more storage easily.
- name: Create gluster volume
  gluster.gluster.gluster_volume:
    state: present
    name: vol1
    bricks: /gluster/brick0
    replicas: 3
    arbiters: 1
    force: true
    cluster: "{{ groups['managers'] }}"
  run_once: true
  when: inventory_hostname in groups['managers']
I used Ansible to tie everything together. Creating replicated storage was super easy and I tried a lot to break it, by changing replicas, moving around nodes, bringing down systems, messing up the DNS, but it was rock solid. I used Ansible to mount the GlusterFS volume, create persistent directories I need that will then be used in Docker Compose files.
Docker Swarm – setting up VRRP, LB
Next, I provisioned the Docker Swarm cluster with Ansible. I chose Docker Swarm because it was simple enough vs running something like Kubernetes. I am also comfortable with Docker Compose so it’s easy for me to provision services.
- name: check/init swarm
  docker_swarm:
    state: present
  register: __output_swarm
  when: inventory_hostname in groups['managers'][0]

- name: install worker
  docker_swarm:
    state: join
    join_token: "{{ hostvars[groups['managers'][0]]['__output_swarm']['swarm_facts']['JoinTokens']['Manager'] }}"
    remote_addrs: "{{ groups['managers'][0] }}"
  when: inventory_hostname in groups['managers'] and inventory_hostname not in groups['managers'][0]
Hosting Services – Keepalived and more
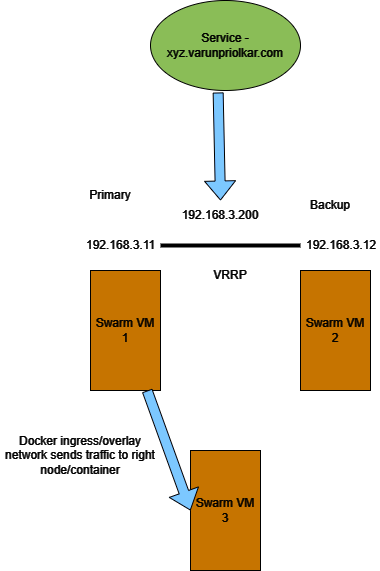
The way Docker Swarm works is that you can send the requests to any of the nodes in the cluster and it will send it to the appropriate container. The issue with this is that you need to know which hosts are online to accept requests. You can either do this with smart DNS or use VRRP, like I did. You can host Keepalived as a Docker service on the Swarm cluster. I injected the environment variables from Ansible facts.
The only issue was that I could not get IPv6 running on Keepalived. Docker Swarm overlay networks also do not support IPv6 so the only way to have IPv6 services is to use host networking mode. I also hosted the other services like:
- Caddy Reverse Proxy – with Traefik style labels
- Monero public node – with Tor endpoint
- RIPE Atlas Probe
- Tor public node
- Homepage – For Homepage displaying all services and status
- Speedtest tracker
- AllKnowingDNS – For IPv6 rDNS
- Portainer
I also made a homepage for all my services. Setting up software is super simple because I just run it on Docker Swarm as a service.
Backups and Monitoring
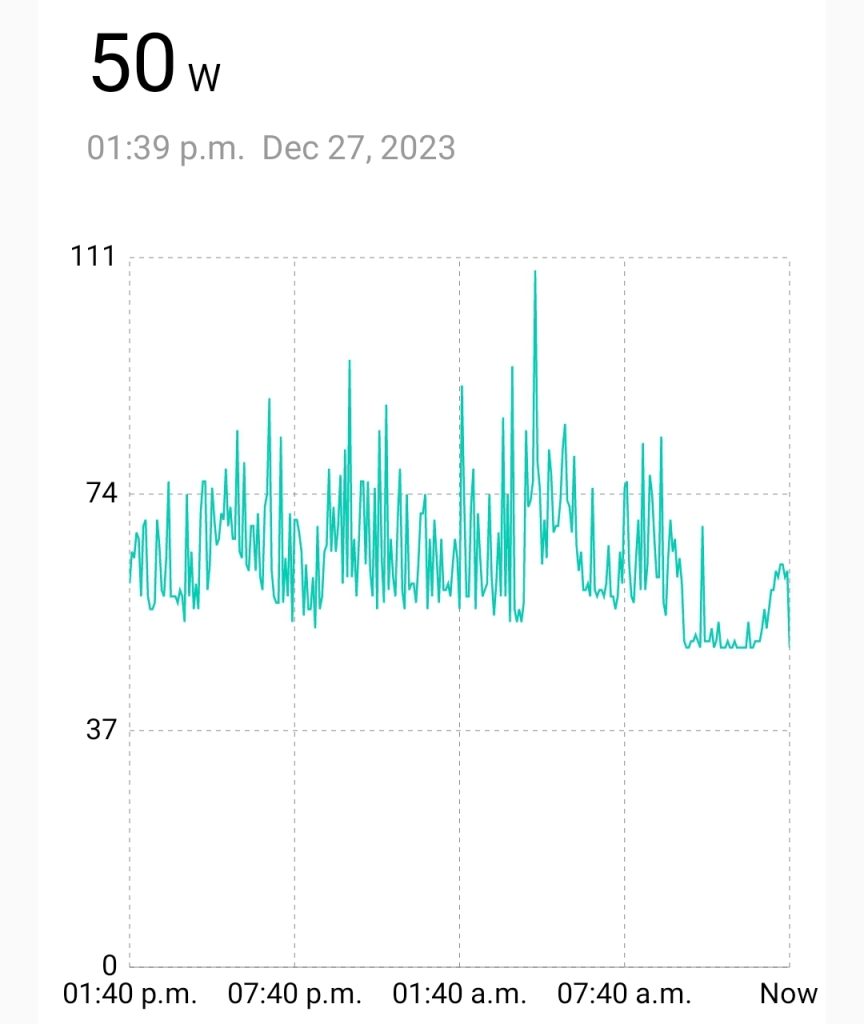
For monitoring power output I got cheap TP-Link Kasa plugs. Unfortunately, I realised that this particular model doesn’t play nicely with third party Prometheus exporter so I’m planning to return it and get something that would work well for monitoring with Grafana and Prometheus.
For backups, I have USB passthroughed a USB SSD to a VM where I am running OpenMediaVault OS. This is USB SSD then mounted on Proxmox hosts using SMB export so that VM backups can be done to this disk. That way I can just plugin the disk anywhere I want to restore. This also backs up my desktop, which is also a VM with GPU passthrough. This works well for now, but in the future I plan to use something like Duplicati to manage multiple copies of backup and backing up the Gluster volume.
Worked on exciting Home Lab project? Tell me more in the comments!