


My setup guide heavily depends on Nginx so you may have to change a few things if you are using some other web server. But this should be helpful never the less. 🙂
I was looking for a nice Google Analytics alternative since I did not want to trust my user’s data with Google. I stumbled upon Piwik and simply was blown away by right from how nice the UI looked to the customisation to the fact that it was completely open source and you could just install it on your own server. Because of this you retain 100% ownership of your data.
How to install Piwik
I simply used this guide to get Piwik running. Installation was a breeze and it didn’t mess up even with a SSL enabled reverse proxy, like WordPress likes to do. Make sure you get the nginx-custom package from the RTcamp repo. If you are using Debian Dotdeb should also work. Make sure you use PHP 7.0 instead of 5.6 mentioned in the article. Choose a nice domain/subdomain and make sure you enable SSL if any of your websites use it and if you choose to do so make sure it is enabled before running the installation. Should make your life easier. I also had to install php-mbstring and a few other PHP extensions which I can’t remember.
Making it work with WordPress
Look at this list for a list of integrations that Piwik has to offer. I use WordPress for my blog so I went with WP-Piwik but it just refused to work, throwing a 5000 ms timeout at me. After trying to make it work for hours, I simply gave up and just put in the analytics code that Piwik gave me just before closing the head section of the header.php file. Do note that you will lose changes on theme updates so it would be a good idea to look at creating a WordPress child theme.
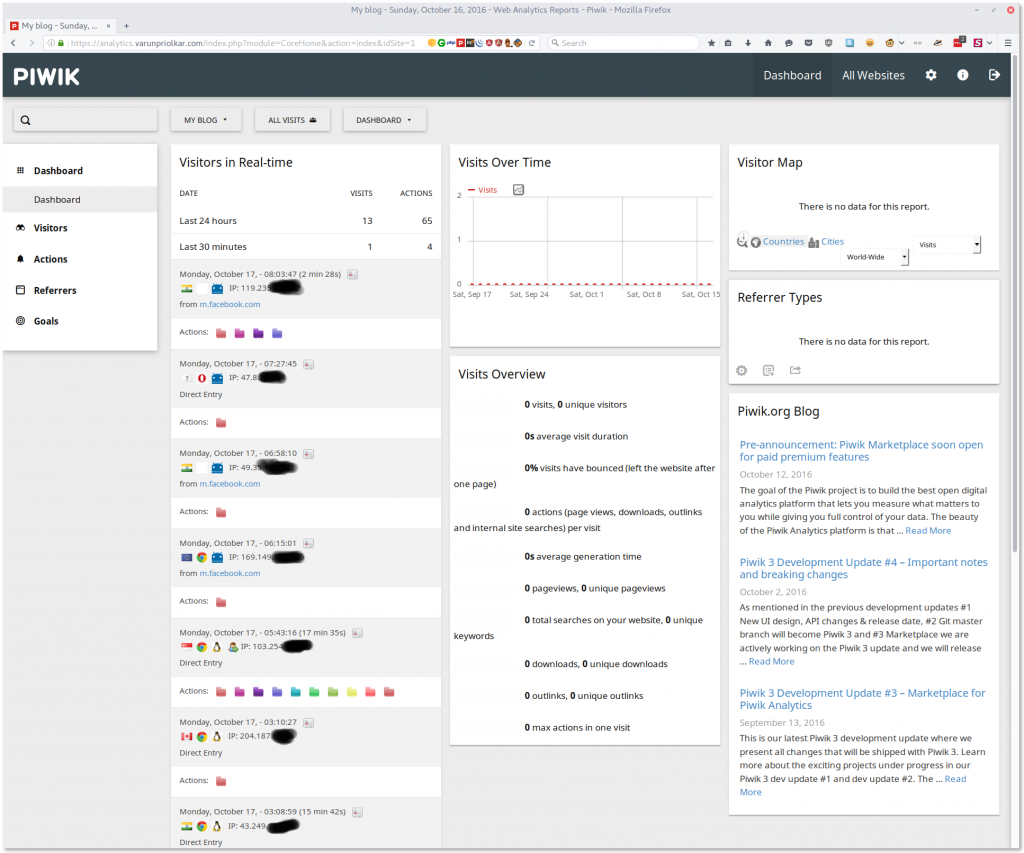
The Piwik dashboard looks breathtakingly good
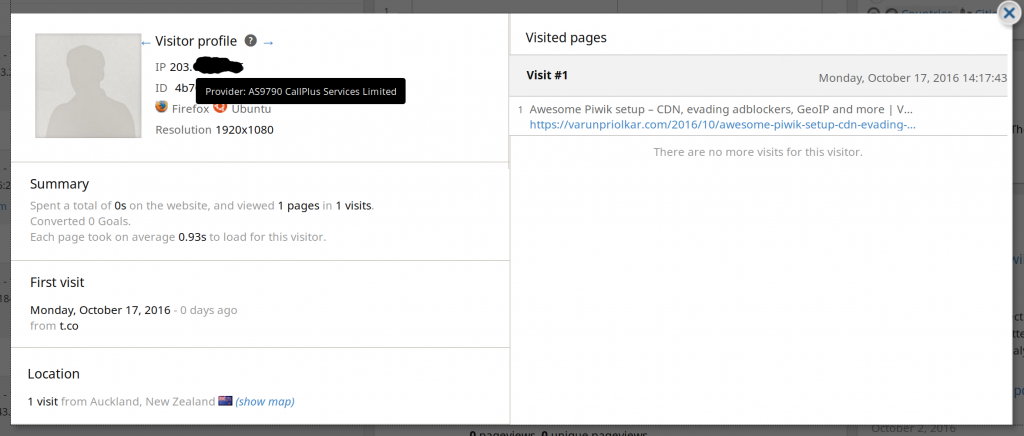
After you get it running, the Piwik dashboard should start showing user visits. The level of detail is simply amazing. You can know the IP address of a person which can be used to auto detect country, city, ISP and ASN(we’ll talk about this later), user resolution, browser, OS, time on each link he/she clicked, referrer etc. The amount of detail is simply astounding.
Moving JS to CDN and evading adblockers
I use Cloudfront for images and that helps massively with the load times. I simply moved https://domainforanalytics.com/piwik.js file over to my S3 bucket and it was accessible right away from my Cloudfront enabled domain. Make sure you rename the file without the word piwik in it. This is because adblockers simply reject. Link to my piwik.js file is https://cdn.varunpriolkar.com/varunpriolkar.js. You can add cache control headers in S3 itself. If you do not want to use a CDN just renaming it to whatever you like should work.
That is not enough. The adblockers still manage to block out piwik.php file. So just rename it from your web root folder. I named mine varunpriolkar.php. Don’t forget to set proper permissions. Next open up /etc/nginx/apps/piwik/piwik.conf. Locate location = /piwik.php and rename it to location = /varunpriolkar.php . Replace varunpriolkar.php with whatever you had renamed the file to. Do note that varunpriolkar.php can become stale or can be overwritten on updates so be careful!
EDIT 17/10/2016: My friend Sunit did point out that you can use URL rewrites to achieve this but I prefer to do it this way. I find rewrites to be a little messy.
Next we will have to modify the tracking code we had put in the document head. I had to change g.src=u+’piwik.js’ to g.src=u+’https://cdn.varunpriolkar.com/varunpriolkar.js’ , <noscript><p><img src=”//analytics.varunpriolkar.com/piwik.php?idsite=1″ style=”border:0;” alt=”” /></p></noscript> to <noscript><p><img src=”//analytics.varunpriolkar.com/varunpriolkar.php?idsite=1″ style=”border:0;” alt=”” /></p></noscript> and _paq.push([‘setTrackerUrl’, u+’piwik.php’]); to _paq.push([‘setTrackerUrl’, u+’varunpriolkar.php’]); . My final analytics code looks something like this.
<script type="text/javascript">
  var _paq = _paq || [];
  _paq.push(['trackPageView']);
  _paq.push(['enableLinkTracking']);
  (function() {
    var u="//analytics.varunpriolkar.com/";
    _paq.push(['setTrackerUrl', u+'varunpriolkar.php']);
    _paq.push(['setSiteId', '1']);
    var d=document, g=d.createElement('script'), s=d.getElementsByTagName('script')[0];
    g.type='text/javascript'; g.async=true; g.defer=true; g.src='https://cdn.varunpriolkar.com/varunpriolkar.js'; s.parentNode.insertBefore(g,s);
  })();
</script>
<noscript><p><img src="//analytics.varunpriolkar.com/varunpriolkar.php?idsite=1" style="border:0;" alt="" /></p></noscript>
<!-- End Piwik Code -->
Getting GeoIP working with Nginx server module
I will only be using Piwik for websites so it makes sense for me to just use the GeoIP module for Nginx to make this work. To make sure you have the module installed run nginx -V and make sure it contains –with-http_geoip_module. If you don’t have it you can either compile Nginx with it or get it as a separate package thanks to the dynamic modules support included in Nginx.
Next we’ll have to find a source for the database for detecting the city, country and ISP/ASN of our user. Maxmind is a company which provides this. However their pricing structure is prohibitively expensive for someone who doesn’t really need the information to be super accurate. They have the GeoLite2 database for free but that needs geoip2 module and getting that working is a little hard. Thankfully there is GeoLite Legacy and that works perfectly with Nginx by default. I have written a script to grab them. This should be good for automation with cron. Make sure you create two directories. One to store them and the other for temporary use. Do mkdir /home/geoip && chown /home/temp to create them. Next copy the script into a file called test.sh and make it executable with chmod +x test.sh. Run with sh test.sh.
#!/bin/bash
LOCATION=/home/geoip
TEMP=/home/temp
cd $TEMP
rm -rf *
wget http://geolite.maxmind.com/download/geoip/database/GeoIPv6.dat.gz
wget http://geolite.maxmind.com/download/geoip/database/GeoLiteCityv6-beta/GeoLiteCityv6.dat.gz
wget http://download.maxmind.com/download/geoip/database/asnum/GeoIPASNumv6.dat.gz
gzip -d *
cd $LOCATION
rm -rf *
cp $TEMP/* $LOCATION/
systemctl reload nginx
systemctl restart nginx
chown -R www-data:www-data $LOCATION
You should notice the required files in /home/geoip . It is safe to get the IPv6 version since they contain they contain the IPv4 addresses as well. You can use crontab -e and put in @monthly /path/to/test.sh to update the GeoIP database monthly. Next open up /etc/nginx/nginx.conf and place this at the end of your server block.
geoip_country /home/geoip/GeoIPv6.dat;
geoip_city /home/geoip/GeoLiteCityv6.dat;
geoip_org /home/geoip/GeoIPASNumv6.dat;
fastcgi_param GEOIP_ADDR $remote_addr;
fastcgi_param GEOIP_COUNTRY_CODE $geoip_country_code;
fastcgi_param GEOIP_COUNTRY_NAME $geoip_country_name;
fastcgi_param GEOIP_REGION $geoip_region;
fastcgi_param GEOIP_REGION_NAME $geoip_region_name;
fastcgi_param GEOIP_CITY $geoip_city;
fastcgi_param GEOIP_AREA_CODE $geoip_area_code;
fastcgi_param GEOIP_LATITUDE $geoip_latitude;
fastcgi_param GEOIP_LONGITUDE $geoip_longitude;
fastcgi_param GEOIP_POSTAL_CODE $geoip_postal_code;
fastcgi_param GEOIP_ORGANIZATION $geoip_org;
Place in geoip_proxy ip_address; as well if you are running Piwik behind a reverse proxy. That should do the trick. Reload/restart Nginx with systemctl reload nginx && systemctl restart nginx and you should be good to go.
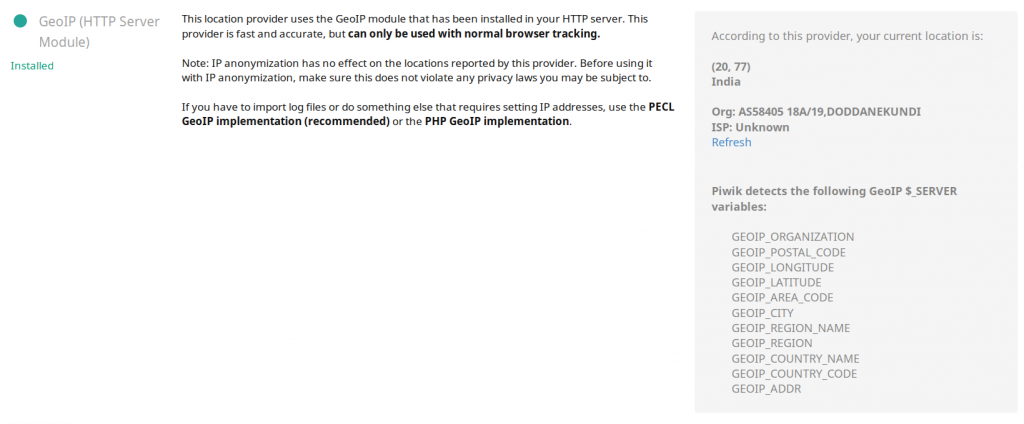
If everything went well you should see something like this in Geolocation settings
Now head on over to Settings>System>Geolocation in your Piwik control panel and enable the GeoIP server module. Enable it and save. Also goto your plugin settings in Settings>System>Plugins and turn on the provider plugin to get the user’s ISP and ASN information. You can also place the GeoIP databases in the misc directory in the web root and it should auto update. I haven’t really looked into it but you can find more info here.
The other little tweaks
The QueuedTracking plugin for Redis caching should help in scaling up but I couldn’t get it to work right. It did work but often gave me stale data, which is no good.
You would also like to disable tracking for your own IPs. Goto Settings>Websites>Settings and block off your own IP so as to not populate the list from you going to the website. This will work fine if you have a static IP, but may not work for a dynamic IP. There is also alerts by email and SMS if you would like something like that. Getting user’s screeen resolution works well too. Don’t forget to checkout all the cool plugins. You can find a list here. Not all plugins may be available to you depending on the version of Piwik you are running. I’m on the 3.x branch. I found the ReferrersManager plugin to be pretty nice.
The live view is detailed, while not being too cluttered
Some people may take offence to their IPs being stored. I have autoset Piwik to delete archives older than a few months. Also you can’t really do much with an IP address and most web servers log requests with IPs anyways. You do however can use the GeoIP functionality to get cool graphs and maps, even in real time. One quote comes to mind:
Administering a server is sort of like being a nurse; there’s a brief period at the start when the thought of seeing people’s privates might be vaguely titillating in a theoretical sense, but that sort of thing doesn’t last long when it’s up against the daily reality of shit, piss, blood, and vomit.
Conclusion
Piwik is simply a fantastic open source project. The amount of tweaks, integration, customisation, plugins you can play around with is simply astounding and it doesn’t even cost you a penny apart from your hosting bill. And the best part is that you own your data. T-Mobile, Wikimedia, Forbes, Sharp, Government of Canada all use Piwik. You should to!
Tell me about your experience with different analytics software. What do you use and why?