

![]()
I had multiple networks scattered around different places and needed a way to link all of them together. They were as follows:
- Work related VPNs. There were multiple VPNs to access different parts of the internal networks. Handling multiple VPN files was very cumbersome. For convinience let’s assume we have a single network here – 172.16.200.0/24.
- Internal network on my VPS/Cloud VM – 10.207.185.0/24.
- Home networks – 192.168.10.0/24 and 192.168.50.0/28(management network).
Additionally I needed a way to remotely access all of these if required. Only home network and the remote network would have uni-directional access to the work related VPNs.
The solution I came up with made the VPS a centrepiece in the setup. The idea was then to:
- Setup work related VPNs on a VPS. Source NAT traffic coming from home/remote network.
- Site to site VPN between home firewall(pfSense VM) and VPS. Add static routes on either end to access required networks.
- Remote VPN to access everything.
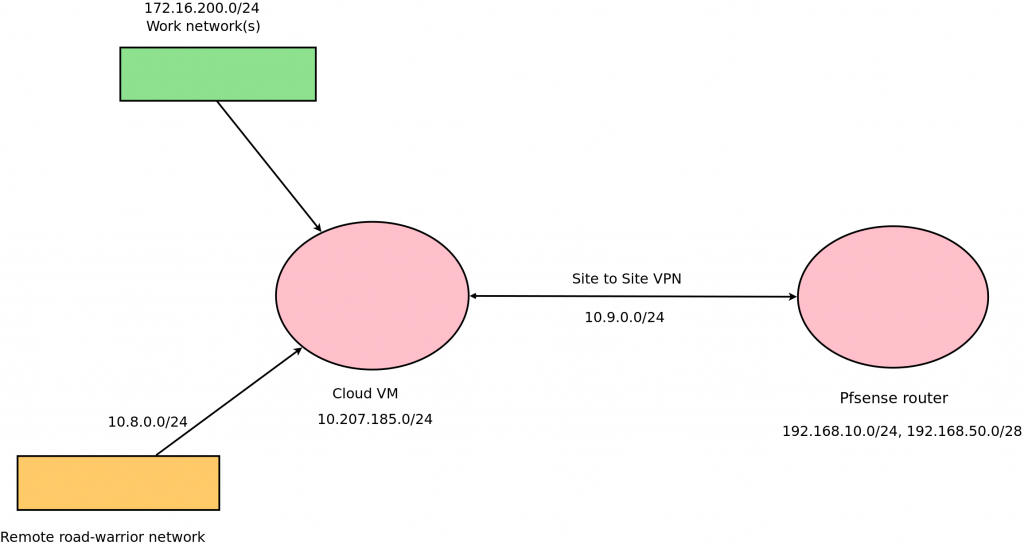
Diagram of my setup
Connect to work VPN clients on Cloud VM
This is simple to do. Simply copy over the VPN config files to /etc/openvpn and start/enable the service with:
sudo systemctl enable openvpn@vpn-client
sudo systemctl start openvpn@vpn-client
Where vpn-client.conf is the name of the VPN client file. Additionally you will have to source NAT to allow traffic from networks you want.
sudo iptables -t nat -A POSTROUTING -s 10.8.0.0/24 -d 172.16.200.0/24 -j MASQUERADE
sudo iptables -t nat -A POSTROUTING -s 192.168.10.0/24 -d 172.16.200.0/24 -j MASQUERADE
Site to site VPN between Cloud VM and pfSense router
I am using pfSense on my home firewall/router. Incase you are using the normal Linux OpenVPN client, you can try this guide. This works perfectly fine with ISPs that do not provide a public IP(NATed IP) and failover works perfectly fine if you have multiple ISP uplinks.
Firstly we’ll have to generate the security key. You can do this with sudo openvpn –genkey –secret /etc/openvpn/vpn.key and allow OpenVPN process to read the key with sudo chown -R nobody:nogroup /etc/openvpn/vpn.key. You will also need to allow IP forwarding with sudo echo 1 > /proc/sys/net/ipv4/ip_forward && sudo sysctl -p /etc/sysctl.conf.
This is the config that I used on the Cloud VM end.
local 103.105.47.10     # Public IP of Cloud VM
float                   # To allow for change in address/port on other end
proto udp
port 1194
dev tun
persist-tun
persist-local-ip
secret /etc/openvpn/vpn.key
user nobody
group nogroup
ifconfig 10.9.0.1 10.9.0.2
route 192.168.10.0 255.255.255.0    #Change this to routes you want to access on other side
route 192.168.50.0 255.255.255.240
keepalive 10 60
comp-lzo
status openvpn-status.log
cipher AES-256-CBC
Open up port 1194 if you are blocking incoming connections. Save this as server.conf and enable/start the service.
sudo systemctl enable openvpn@vpn-client
sudo systemctl start openvpn@vpn-client
On the pfSense side, goto >VPN>OpenVPN>Clients>Add and add options as follows:
- Server mode: Peer to Peer (Shared Key)
- Protocol: UDP on IPv4 only
- Device mode: tun – Layer 3 Tunnel Mode
- Interface: Your WAN GW(GW group will also work)
- Server host or address: 103.105.47.10
- Server port: 1194
- Shared key: Copy paste from /etc/openvpn/vpn.key on server end.
- Encryption Algorithm: AES-256-CBC
- NCP Algorithms: AES-256-CBC
- Auth digest algorithm: SHA1(160-bit)
- IPv4 Tunnel Network: 10.9.0.0/24
- IPv4 Remote Network(s): 172.16.200.0/24, 10.207.185.0/24, 10.8.0.0/24
- Compression: LZO Compression
- Gateway creation: IPv4 only
Goto >Status>OpenVPN and enable the process, goto >Interfaces>Assignments and add the OpenVPN interface and enable it.

OpenVPN client status on pfSense
In the >Firewall>Rules enable everything coming in through the VPN interface. You can tweak this later. If everything worked like it should you should be able to ping the other side from your home network. If not, check the logs.
Remote(road-warrior) OpenVPN setup
A remote VPN setup is necessary in case you are not connected to the home network or are outside. There are many people who have very good guides on setting this up. You can refer to the Digitalocean guide. You will have to run this service on a port other than UDP/1194. I’m using UDP/8080. The other change is that you have to ignore the Push DNS Changes to Redirect All Traffic Through the VPN section and push the required routes only by adding this to config file.
push "route 172.16.0.0 255.255.255.0"
push "route 192.168.10.0 255.255.255.0"
push "route 192.168.50.0 255.255.255.240"
push "route 10.207.185.0 255.255.255.0"
Connect to the VPN from a non-home network and verify everything works correctly by pinging desired nodes. The end result should be that you should be able to connect to all your networks with just one VPN config/certificate file.
Override specific remote VPN routes on home network
There are cases where I have to connect to/am connected to remote VPN on the home network. In that case, that can totally mess up the normal home traffic. For that there is a simple solution. We have to push a less specific route for the home networks via the remote VPN setup. Let’s change the subnet mask in the above eg. to one value more for the concerned subnets.
push "route 192.168.10.0 255.255.254.0"
push "route 192.168.50.0 255.255.255.224"
One issue is that it’ll still choose to go to 192.168.50.0/28 via the VPN since the only other route is the default. For we have to push the route via DHCP server. In pfSense, there is an option in >Services>DHCP server>Additional BOOTP/DHCP
- Value: 21
- Type: String
- Value: Use HexRoute tool to generate this value
This process may be different for other DHCP clients. For instructions for dhcpd follow this link.
I made a short video to demonstrate how well this all works while switching between WiFi/LTE.
So end result for working connectivity is as follows. Arrows represent traffic flow, colours in.
- Remote VPN > Work VPN (NAT)
- Remote VPN > Home, management network (No NAT)
- Remote VPN > VPS network (No NAT)
- VPS network > Home, management network (No NAT)
- VPS network > Remote VPN (No NAT)
- VPS network > Work VPN (No iptables src NAT rule)
- Home network > Work VPN (NAT)
- Home network > Remote VPN (No NAT)
- Home network > VPS network (No NAT)
- Work VPN > any network
This setup completely fixed all connectivity issues for me. The best part is that this does not use NAT between networks except for connecting to work VPN network.