

For a long time, I thought DNS was a solved problem and I just used my domain host’s or my VPS provider’s free authoritative DNS service. This worked fairly well, but I started to run into limitations when I wanted to do slightly complex things like using my DHCP server to update records using RFC2136 DDNS updates and GeoIP.
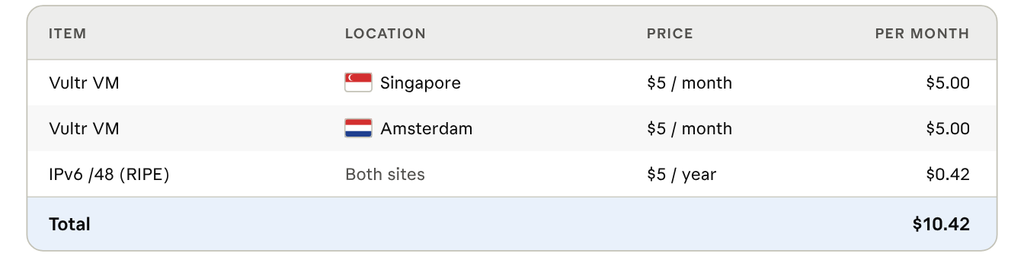
So I started using PowerDNS as my authoritative DNS. However one issue that I wanted to fix was that of high availability and decent response time for users around the world. So I wanted to try setting up a BGP Anycast setup with clustering for PowerDNS. In terms of requirements, I needed 2 VMs and a /48
Setting up Multi Master PowerDNS Cluster with LMDB
The first thing I wanted to do was setup PowerDNS itself. Earlier the recommended method was to run a DB like MariaDB for PowerDNS and use some sort of clustering. However this is complex to manage and requires a lot of resources at multiple locations.
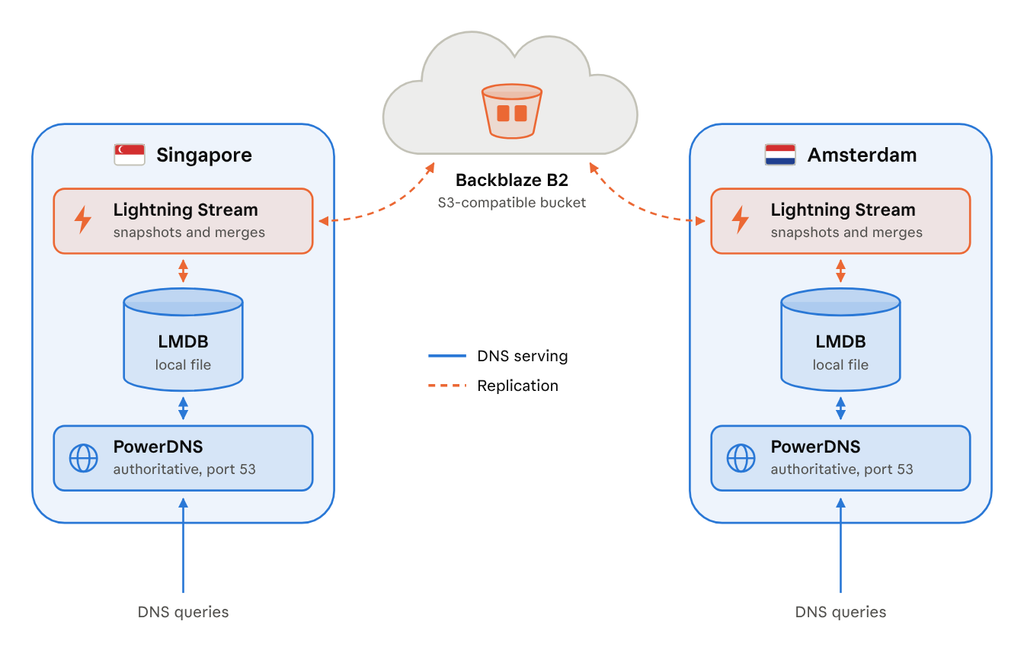
PowerDNS has support for a backend called LMDB(Lightening Memory Mapped Database), which is a key value pair database. They later developed Lightening Stream, which hit stable in June 2026. This let you sync LMDB with a S3 compatible store in near real time, meaning you could simply connect your PowerDNS instance to a local LMDB, which synced using Lightening Stream to a centralized S3 bucket. You can simply replicate this configuration at every site to get multiple PowerDNS servers.
This is what my Docker config looked like:
services:
  pdns:
    image: powerdns/pdns-auth-51:5.1.5
    ports: ["53:53/udp", "53:53/tcp"]
    volumes: [lmdb:/var/lib/powerdns]
    configs: [{ source: pdns, target: /etc/powerdns/pdns.conf }]

  lightningstream:
    image: powerdns/lightningstream:1.0.5
    user: "953:953"
    command: --config /ls.yaml --instance ns1 sync
    volumes: [lmdb:/var/lib/powerdns]
    configs: [{ source: ls, target: /ls.yaml }]

configs:
  pdns:
    content: |
      launch=lmdb
      lmdb-filename=/var/lib/powerdns/pdns.lmdb
      lmdb-shards=1
      lmdb-lightning-stream=yes
  ls:
    content: |
      lmdbs:
        main:  { path: /var/lib/powerdns/pdns.lmdb,   schema_tracks_changes: true, options: { no_subdir: true, create: true } }
        shard: { path: /var/lib/powerdns/pdns.lmdb-0, schema_tracks_changes: true, options: { no_subdir: true, create: true } }
      storage:
        type: s3
        options: { access_key: KEY, secret_key: SECRET, bucket: pdns, endpoint_url: https://s3.example.com }

volumes:
  lmdb:
Network Redundancy with BGP Anycast
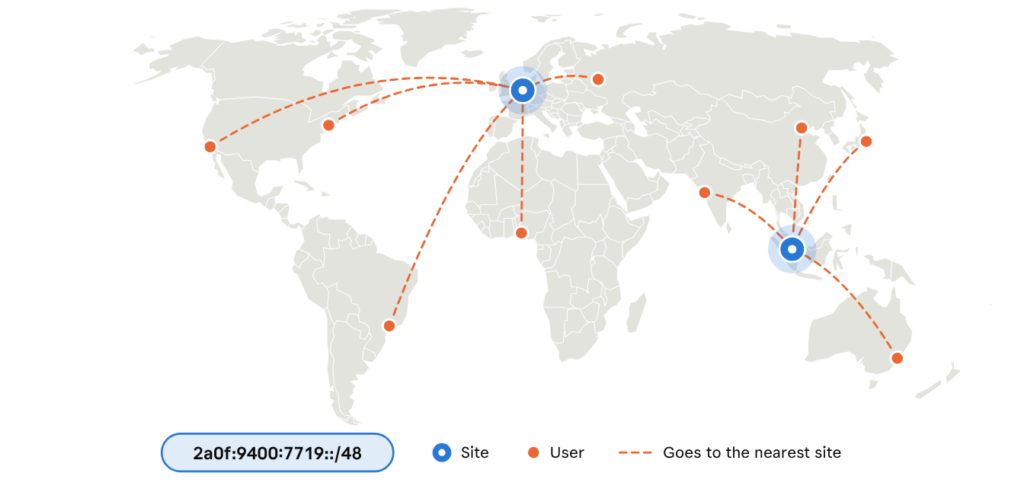
The best way to build redundancy for network is with BGP and Anycast. BGP allows you to announce your IP space to the global internet. Anycast is nothing but announcing the IP space from multiple sites. The idea is that the network on the otherside will send traffic to your closest node.
So I leased prefix from the company that I leased IP resources in the past from – Free Range Cloud and decided to announce them over Vultr, which supported BGP for no additional cost. It is recommended that you get a public ASN for announcing resources on the internet, but I had to skip this and use a private ASN as it was outside my budget. Vultr would then strip this and attach their own ASN before announcing resources publicly.
In my IP resource leasing panel, I added the following records:
- RIR records – This let me add maintainer objects so that WHOIS would display correctly for my resources.
- ROA RPKI records – Cryptographically signed records so that networks can validate your routes and drop invalid announcements.
- IRR DB records – Helps networks build filters to accept your announcements.
Then I asked Vultr to give me a private ASN to announce with and to validate my prefix for announcing, which they promptly helped me with.
Inbound Traffic Optimization with BGP
For outbound traffic at each location it’s easy. You just send traffic to the best routes. So I just chose to accept the default route.
For inbound traffic is where it gets tricky. Because the other peer is learning your prefix from multiple locations, they will use BGP path selection metrics to select the best one, which does not account for latency or geographic location at all. One of main BGP path selection metrics is Local Preference. Because it makes sense from a commercial point of view, networks set high local preference for customer learned routes, medium for routes learnt over peering and high for transit routes. This means that if a network learns a route in Europe as a transit, it would rather pick this route and carry traffic over it’s backbone for another customer in Asia than pick the route it learnt in Asia.
Because of this we need announcements over same transits at all locations. So I did an exercise to figure out their transits at various locations. I used a combination of looking glass to find IPs, Hurricane Electric’s BGP tool, route views project and AI to go over results and figure out which transits were present at which locations and came up with a list. Multiple views of the global BGP routing table is required so that we can get a view from different networks as only the best routes will filter to us from any one view.
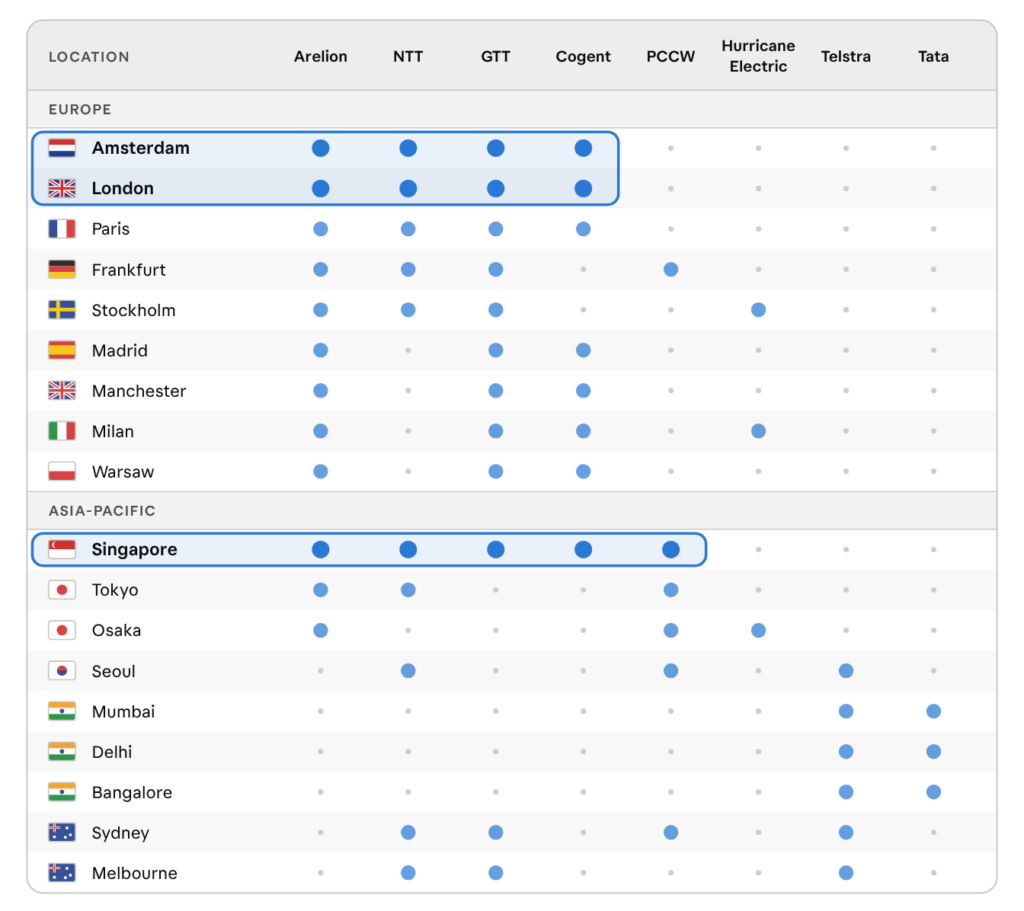
Every transit is good at specific thing and each one has weaknesses.
- Arelion(formerly Telia) – Global backbone with strong connectivity to eyeball networks in North America and Europe.
- NTT – Has best Asia-Pacific, especially Japanese routes.
- GTT – Tier-1 with mostly European and North America footprint.
- Cogent – Cheap, high volume transit with many customers that are Cogent only. Has had reachability issues with other transits.
I picked locations that have all these and decided to go with Amsterdam and Singapore. At some point I’ll look to add a North America location. I also have a non-anycast PowerDNS server in my home in Canada to act like a backup. So I just announced the prefix to Vultr with communities set as 20473:6000 64699:1299 64699:3257 64699:2914 64699:174. This makes sure that I only announce to these upstreams and not to any other peers. This is what my config looked like.
ipv6 route 2001:db8::/48 blackhole
!
route-map VULTR-OUT permit 10
 set community 20473:6000 64699:1299 64699:3257 64699:2914 64699:174
!
router bgp 64512
 no bgp ebgp-requires-policy
 neighbor 2001:19f0:ffff::1 remote-as 64515
 neighbor 2001:19f0:ffff::1 ebgp-multihop 2
 neighbor 2001:19f0:ffff::1 password YOUR_BGP_PASSWORD
 !
 address-family ipv6 unicast
  network 2001:db8::/48
  neighbor 2001:19f0:ffff::1 activate
  neighbor 2001:19f0:ffff::1 route-map VULTR-OUT out
 exit-address-family
I used RIPE RIS, Route Views to confirm that the announcements were going out as they should. I also created an interface called anycast0 with a /128 from this /48 and made Docker container earlier listen to it. That was all that was needed to get PowerDNS working.
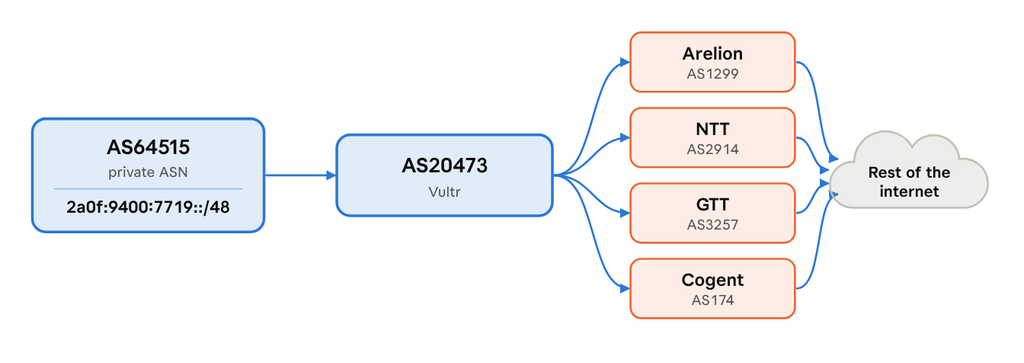
I also went ahead and setup a similar setup in Amsterdam to complete my 2 node anycast cluster. Adding more nodes is basically the same process. Ofcourse you will need to setup NS and glue records in your domain registrar for this to work. I setup these values with my registrar.
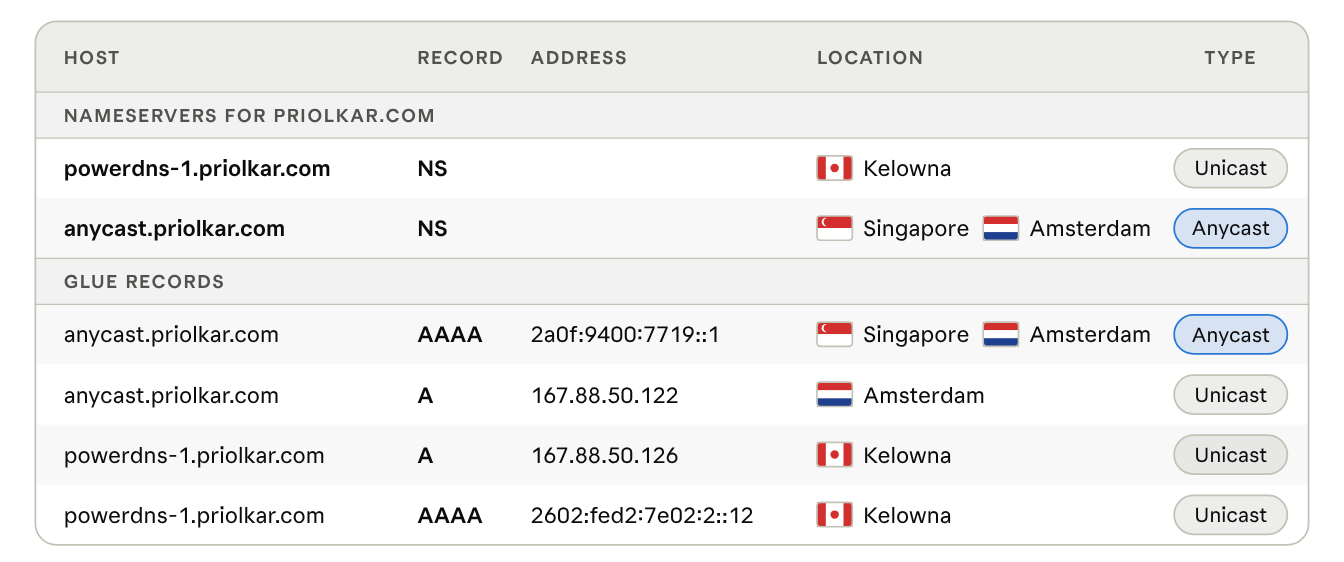
Do note that I setup A record for anycast.priolkar.com to my server in Amsterdam for redundancy. This way DNS should work as normal even if my other server powerdns-1.priolkar.com completely fails.
Measuring Performance Improvement
I used RIPE Atlas project to measure the change in RTT for DNS queries. To remove as many cached results, I flushed Google and Cloudflare cache.
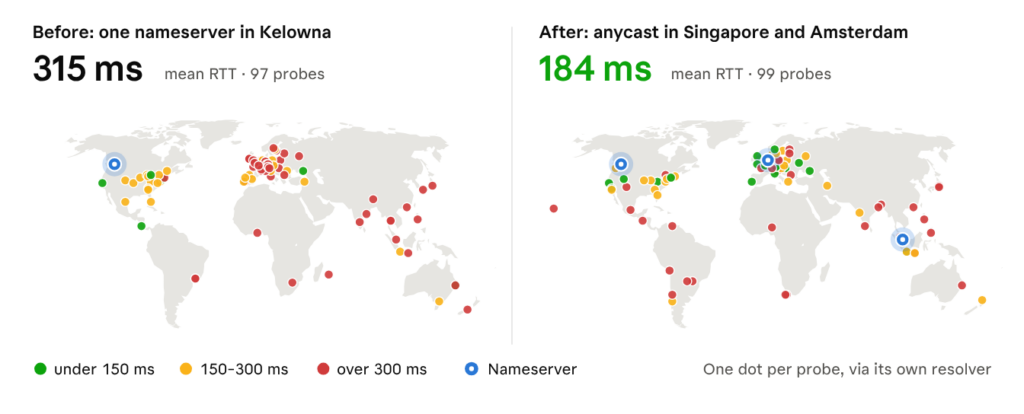
- Measurement before – RIPE measurement.
- Measurement after – RIPE measurement.
The way resolvers query authoritative servers varies and some do not query in parallel so may still hit the non-anycast server, but RTT for most queries should be quicker.